Raspberry Pi is an incredibly versatile computer that delivers much more power and functionality than its small stature suggests. Now, with ten years of solid development behind it, Raspberry Pi computers and Raspberry Pi OS are packed with activity. Hidden in amongst all the hardware and software are some real gems of tricks that you can use to learn more about computing, make better projects, and get far more out of Raspberry Pi than you ever thought possible. In this feature, we’re going to unearth hidden hacks and handy tricks that every talented Raspberry Pi owner should know.
Raspberry Pi OS Tricks
Get under the hood of Raspberry Pi OS
Overlay File System
Overlay File System keeps Raspberry Pi OS in a fresh state. With Overlay File System enabled, any changes you make are saved to RAM instead of storage, and are lost when you reboot.
This is useful for using Raspberry Pi in a public setting where you want people to be able to use the operating system without making any permanent changes to it. Such as with a Raspberry Pi set up in a store.
Open Raspberry Pi Configuration and choose the Performance tab. Click Configure next to Overlay File System and enable User Overlay.
The write-protect boot partition enables you to lock down the boot partition for even more security.
Take a look at the kernel
Raspberry Pi kernel is stored in GitHub (github.com/raspberrypi/linux). It follows behind the main Linux kernel. Raspberry Pi takes long-term releases of the kernel, which is mentioned on GitHub, and integrates the changes into Raspberry Pi kernel. There is also a ‘next’ branch that contains an unstable port of the kernel. After extensive testing and discussion, the next branch becomes the main branch.
Set up a new user
As a security measure, you should set up a custom user name, rather than using the default ‘pi’ user that has been used in Raspberry Pi OS (and previously Raspbian) since the beginning.
Get on board with improved security and create your own new user account.
Create new users in Raspberry Pi OS with adduser and the desired username (in this example, ‘izzy’):
sudo adduser izzy
You will be prompted for a password for the new user, izzy. Enter a password for security reasons. Terminal will ask for the Full Name, Room Number, Work Phone, Home Phone, and Other information. Press RETURN to keep these blank and enter ‘y’ to ‘Is the information correct?’
When you create a new user, they will have a home folder in /home/. Upon creating a new user, the contents of /etc/skel/ will be copied to the new user’s home folder. You can add or modify dot-files such as the .bashrc in /etc/skel/ to your requirements, and this version will be applied to new users.
Switch users
The su command (related to sudo, which we’ll look at later) is used to ‘switch user’.
su izzy
…will switch between your current user and izzy. Use whoami to see which user you’re currently using.
whoami
…will return ‘izzy’. You’ll be in the pi folder still so use cd to switch to izzy’s folder.
cd /home/izzy
Use ls and you’ll see the files created by /etc/skel.
Sudoers list
The default user on Raspberry Pi OS is a member of the sudo group, which enables it to perform elevated actions (as root) when you use the sudo command.
To add your new user to the sudo group, use:
sudo adduser izzy sudo
Now they’ll also be able to use sudo.
Move to 64-bit
If you’ve been running Raspberry Pi OS for a while, the chances are you’re using the 32-bit version. It’s time to double-up to the latest, 64-bit edition. This came out of early beta testing last month, and can now be found inside Raspberry Pi Imager magpi.cc/imager). If you have a Zero 2 W, Raspberry Pi 3, Raspberry Pi 4, or Raspberry Pi 400, then make the switch to Raspberry Pi OS (64-bit). Read Gordon Hollingworth’s blog for a detailed write-up (magpi.cc/64bit).
Chances are you’re using the 32-bit version of Raspberry Pi OS
Updating Raspberry Pi
It’s best to update Raspberry Pi OS using the built-in Software Updater tool. You should do this frequently. It’s important to keep Raspberry Pi OS up-to-date for security purposes, and also to ensure you are running the latest version, which will contain fewer bugs.
It is also possible to update Raspberry Pi OS using APT (Advanced Packaging Tool) in Terminal, but make sure to do a full upgrade (rather than just a regular upgrade).
sudo apt update
sudo apt full-upgrade
Using full-upgrade (over just regular upgrade) ensures that APT picks up any dependency changes that have been made.
Take control of your Raspberry Pi from across a network
Copy files with SCP
After you have connected to Raspberry via SSH (or VNC), you’ll soon wonder how to copy files to and from a remote computer on the network. There are a few different ways to copy files, and we generally prefer to use SCP (secure copy).
While in Terminal on your source computer, you use the scp command with the SSH login details and file location (separated by a colon). It looks like this:
scp <user@IP>:path/to/file path/to/ destination
Let’s say we want to copy a file called test.txt from the Desktop on our Raspberry Pi to the Desktop on our remote computer; we would enter:
scp pi@192.168.0.40:/home/lucy/Desktop/test.txt /home/lucy/
We find it less wordy to navigate to the destination folder on our computer, and then use a dot ‘.’ as the destination to copy the file to the current location
cd ~/Desktop
scp pi@192.168.0.40:/home/lucy/Desktop/test.txt .
If you copy a lot of files, you can install FTP (File Transfer Protocol software) like FileZilla (filezilla-project.org) and use it to transfer files across computers on your network.
Remote control: VNC
VNC enables you to remotely access Raspberry Pi from another computer. VNC is a graphical desktop system that lets you view the desktop of Raspberry Pi OS from a window in another computer.
To do this, you’ll need to activate server software in Raspberry Pi OS and install viewer software on your other computer (this can be a Mac, PC, or Linux computer, or another Raspberry Pi).
Raspberry Pi OS comes with VNC Server built in. All you need to do is turn it on. Open Raspberry Pi Configuration (menu > Preferences > Raspberry Pi Configuration) and choose Interfaces. Set VNC to On and click OK.
The VNC Server icon will appear in the menu bar. Click it to open the VNC Server window, and you will see the IP address underneath.
You will most likely need to install VNC Viewer on the other computer (magpi.cc/vncviewer). Once installed, open the IP address of your Raspberry Pi into the text bar of VNC Viewer and press RETURN. Enter the Username and Password for Raspberry Pi OS and click OK.
You will now be able to remotely access Raspberry Pi OS desktop in a window on your remote computer. Take a look at magpi.cc/vnc for more information.
Set Headless Resolution
When accessing Raspberry Pi OS remotely, without a monitor attached, you will find the desktop defaults to a tiny 640×480 resolution. There is an easy way to fix this. Open Raspberry Pi Configuration and click Display. Set Headless Resolution to a higher setting (it will need to be compatible with your monitor). Click OK and you will be prompted to restart your Raspberry Pi. When it reboots, you’ll be using the new resolution.
Set a custom hostname
Your Raspberry Pi computer’s hostname is well worth getting to know. The hostname is a label that can be used to identify and locate your Raspberry Pi on a network. By default, all Raspberry Pi computers have the hostname ‘raspberrypi’. You can connect to a Raspberry Pi using the hostname and a ‘.local’ suffix instead of the IP address.
ssh pi@raspberrypi.local
If you have more than one Raspberry Pi, it’s a good idea to start renaming them. Open the Raspberry Pi Configuration tool under Raspberry Pi menu > Preferences and choose the System tab. Change the text field in ‘Hostname’ to your custom name and click OK. You will need to restart Raspberry Pi OS for the change to take effect.
ssh pi@raspberrypi.local
Remote control: SSH
SSH (Secure Shell) is the simplest way to access a Raspberry Pi on your network. The downside is that it works via the Terminal and is commandline based. You need to activate SSH on your Raspberry Pi first. Launch Raspberry Pi Configuration from the Preferences menu and choose Interfaces. Set the radio button next to SSH to Enabled and click OK.
You’ll need the IP (Internet Protocol) address for your Raspberry Pi, which you can see by hovering your mouse over the network icon in the menu bar. It will be a sequence of four numbers separated by dots. Ours is: ‘192.168.0.40’ and the username of Raspberry Pi, which on our computer is ‘pi’.
Open a Terminal app on a macOS or Linux system, or PowerShell on a recent edition of Windows. Many Windows users use a Terminal app called PuTTY (putty.org).
To connect, you need to enter ssh <user>@<ip address>. For example:
ssh pi@192.168.0.40
You will be prompted for that username’s password of the remote computer (the Raspberry Pi you are connecting to). Enter it and respond with ‘yes’ to the security prompt. You will only see this prompt the first time you attempt to log in. You will now be signed in to your Raspberry Pi.
Get Headless With Raspberry Pi OS
When you first set up Raspberry Pi, you generally connect a screen, keyboard, and mouse and navigate Raspberry Pi OS using the graphical user interface.
This isn’t the only way to use Raspberry Pi though, and you can install Raspberry Pi OS Lite (64-bit). This is a port of Raspberry Pi OS with no desktop environment – everything takes place in the Terminal.
There are a lot of advantages to running Raspberry Pi OS in headless mode. Especially if your project is going to be used remotely, without a screen attached (say, as a weather monitor or security camera). Once these projects are set up, you’ll only access them remotely via SSH, so it makes sense to set them up as light as possible. The download is only 0.4GB, so it fits on smaller microSD cards.
Thanks to a recent update in Imager, it’s much easier to add custom settings to Raspberry Pi OS during the installation procedure. You can now add custom hostname and wireless LAN settings, as well as activate SSH for remote access. This makes it possible to fully set up a headless Raspberry Pi without ever having to attach a keyboard and monitor.
Use Imager to set up a headless Raspberry Pi
01 Install Imager
Imager is an app for Windows, macOS, and Linux that makes it easy to set up Raspberry Pi OS and other operating systems. View installation instructions at magpi.cc/imager. Open Imager and attach a microSD card to your computer. Click on Choose OS and select Raspberry Pi OS (other) and Raspberry Pi OS Lite (64-bit) if you are using a Raspberry Pi 3, 4, 400 or Zero 2 W; or 32-bit if you are using an earlier computer.
02 Set the hostname
Choose Storage and select your microSD card (we’re using a 4GB microSD card as we don’t need the full 8GB required by the full desktop OS). Before starting the process, click on the Advanced Options cog in the bottom-right. Here you can set up a range of options for the install, which will be very helpful when running headless mode. Start with ticking ‘Set hostname’, and change it to something unique on your network; we’re changing from the default ‘raspberrypi’ to ‘zero2’.
03 Connect to the network
Check the ‘Set username and password’ and enter a password. Now check ‘Configure wifi’ and enter your SSID (wireless network name) and wireless LAN password. Finally, set the locale settings to your location. Click Save when you’re done. Click Write and Yes to record the Raspberry Pi OS Lite operating system to the microSD card. And Yes again to the warning and enter your password if required.
04 Connect via SSH
Wait till it’s finished and transfer the microSD card to your Raspberry Pi. Now bootup and Raspberry Pi will connect to your local wireless network. And you can connect to it via SSH from Terminal on another computer. Wait for Raspberry Pi to boot and use the custom hostname (that you set up in Imager) to connect to it. You can locate the IP address using:
ping zero2.local
And connect to the computer using SSH and the hostname:
ssh pi@zero2.local
Or via the IP address (substituting the numbers for Raspberry Pi on your network):
ssh pi@192.168.0.22
From here on in, you can access your Raspberry Pi via SSH on another computer. This setup is ideal for Raspberry Pi projects that don’t use a keyboard and screen, and which embed Raspberry Pi in a mobile or hard-to-reach location, such as a robot or security camera.
“There are a lot of advantages to running Raspberry Pi OS in headless mode”
Decode the LEDs
Raspberry Pi boards have a red power light and a green status light. If Raspberry Pi fails to boot or has to shut down, the LED will flash a specific number of times to represent the situation. Use this able to decode the LEDs.
|
Long
flashes |
Short flashes |
Status |
|
0 |
3 |
Generic failure to boot |
|
0 |
4 |
start*.elf not found |
|
0 |
7 |
Kernel image not found |
|
0 |
8 |
SDRAM failure |
|
0 |
9 |
Insufficient SDRAM |
|
0 |
10 |
In HALT state |
|
2 |
1 |
Partition not FAT |
|
2 |
2 |
Failed to read from partition |
|
2 |
3 |
Extended partition not FAT |
|
2 |
3 |
File signature/hash mismatch - Pi 4 |
|
3 |
1 |
SPI EEPROM error - Pi 4 |
|
3 |
1 |
SPI EEPROM is write protected - Pi 4 |
|
3 |
3 |
I2C error - Pi 4 |
|
4 |
4 |
Unsupported board type |
|
4 |
5 |
Fatal firmware error |
|
4 |
6 |
Power failure type A |
|
4 |
7 |
Power failure type B |
Next Level Terminal
The joy of text with Raspberry Pi’s command-line interface
Switch to root
An elevated su command on its own switches to the root user. Enter:
sudo su
…to run a shell as the root user. Every command you enter will be as a superuser, so you do not need to use sudo or enter a password. This can be helpful with complex installations that require multiple sudo privileges. It’s a bad habit though, and you should only use sudo su when required and exit from the root shell as soon as possible (enter exit).
You can learn more about sudo in Raspberry Pi’s documentation.
Config.txt
The config.txt file is read by the GPU before the ARM CPU and Raspberry Pi OS Linux is initialised. It is located on the first (boot) partition of the microSD card alongside the bootcode.bin and start.elf files.
It is possible to view the values of config.txt without opening it, using vcgencmd get_config <config>. For example:
vcgencmd get_config arm_freq
…will return the CPU frequency set in config.txt. You can also use int and str to see all values stored as integers and strings.
vcgencmd get_config int
vcgencmd get_config str
You can edit config.txt using:
sudo nano /boot/config.txt
It is also one of the files you can edit manually by removing the microSD card from Raspberry Pi and attaching it to another computer (macOS, Windows, or Linux).
Any changes you make to config.txt will only take place after you reboot Raspberry Pi.
Take a look at the official Raspberry Pi documentation (magpi.cc/configtxt) to discover more about the settings in config.txt
Raspi-config is your friend
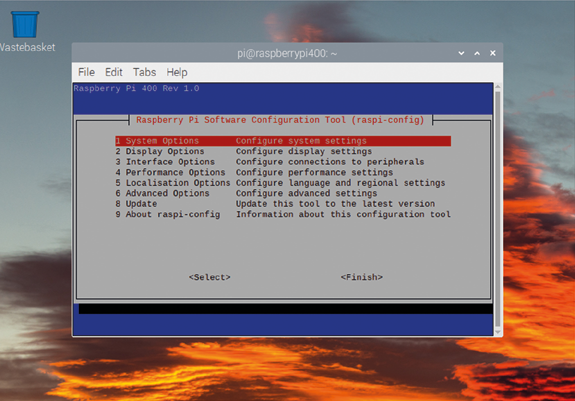
When Raspberry Pi first came out, raspi-config was used widely to adjust settings without diving into the underlying configuration files. This handy tool can be accessed from Terminal with:
sudo raspi-config
These days it’s easier to use Raspberry Pi Configuration (under menu > Preferences) when in the desktop interface. But if you’re using Terminal, headless, or accessing via SSH knowing raspi-config can be a gamechanger. See magpi.cc/raspiconfig for more info.
Behind Raspberry Pi Configuration and raspi-config is a text file called config.txt. This sets many settings for Raspberry Pi OS.
Go back in time
If you want to go the other way, you can install earlier shells.
sudo apt install tcsh
sudo apt install csh
Then open into them with csh or tcsh. They are a lot more limited compared with the default Bash shell, and csh (C Shell) doesn’t have tab autocomplete or history. Use exit to back out and back to your default shell.
Change default shell
You can change your default shell from Bash to Zsh (or earlier shells) using:
chsh -s $(which zsh)
You will be asked to enter your admin password. And changes only take effect on restart:
sudo reboot
Open a Terminal window and you will be greeted with Z Shell.
To get back to Bash, enter:
chsh -s $(which bash)
…and reboot.
Tab completion
It’s a basic hack but if you don’t know it, tab completion is a game-changer. When using the Terminal, simply start typing a command or directory location and press the TAB key to complete it. For example, to navigate to the Documents folder, open a Terminal window and enter:
cd Doc
…and press TAB. Hey presto, it automatically fills up the rest. If there’s more than one location, it’ll show you the options and let you carry on entering letters. Try:
cd D
…And press TAB and you’ll see ‘Desktop/ Documents/ Downloads’. Carry on entering letters until you can autofill the command. You can use TAB multiple times in each command to fill out commands, files name, directory paths, and much more.
Top and htop
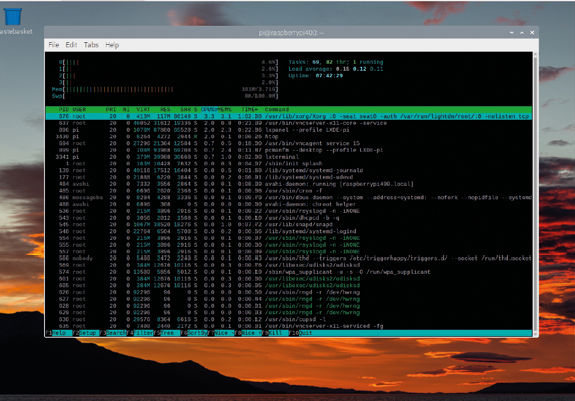
Top is an app used to display Linux processes, you can get it from the command line using:
top
On the right is the COMMAND column, which has the name of the processes running. The PID is the process ID (the number of each process. The VIRT, CPU, and MEM columns tell you how much virtual memory, physical memory, and CPU usage for each process. Unlike most Terminal commands, top runs in an interactive mode with constantly refreshing windows. Press H to view keyboard commands, and ESC to return to the main window.
Press Q to quit top and return to the command line.
Htop is a more interactive, colourful version of top. Enter this at the command line:
htop
…And press Q to quit.
sudo apt-get install htop
Pressing H or F1 will bring up the help menu. Enter man htop to take a look the manual, and the htop.dev website has more information on how to use the program.
Use vcgencmd
The vcgencmd tool is a special terminal command designed for Raspberry Pi. It outputs information from the VideoCore GPU on Raspberry Pi and is especially handy for getting information on all aspects of hardware performance.
Get a complete list of all the vcgencmd commands using:
vcgencmd commands
You can use:
vcgencmd measure_temp
These return the current system temperature. And check how much RAM is in your Raspberry Pi with:
vcgencmd get_config total_mem
Measure the current screen resolution with:
vcgencmd get_lcd_info
Get more information on using vcgencmd in Raspberry Pi’s documentation pages (magpi.cc/vcgencmddoc). For the curious, take a look at the source code for the vcgencmd utility on GitHub (magpi.cc/vcgencmdgit). 42 magpi.cc Hidden Hacks for Raspberry Pi
FEATURE Which shell?
Wondering which shell you are using. There’s a command for that:
ps -p "$$"
See this StackExchange post for an explanation: magpi.cc/checkshell.
Oh My Zsh
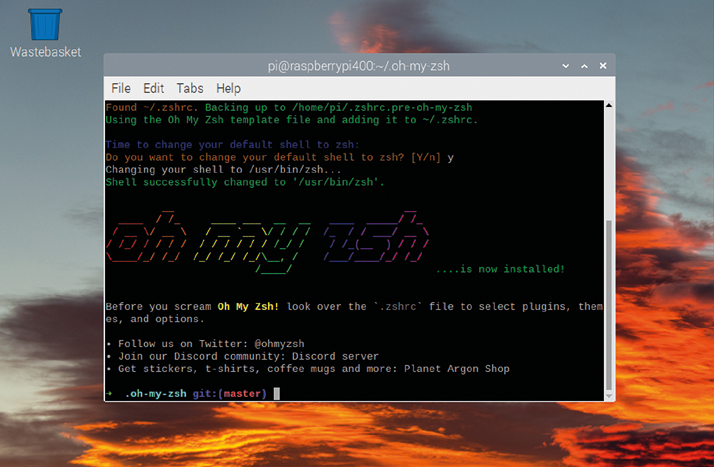
Oh My Zsh (ohmyz.sh) is an extension to ZSH which enables you to take things even further, with a large number of alias shortcuts, themes, and plug-ins that enable you to add a huge range of functionality to the shell – everything from integrated web search to advanced GitHub functionality.
Install Oh My Zsh using a script (also available on the website):
sh -c "$(curl -fsSL https://raw.github.com/ ohmyzsh/ohmyzsh/master/tools/install.sh)"
Take a look a the documentation if you want more information on Oh My Zsh (magpi.cc/omzwiki), and bookmark the cheatsheet (magpi.cc/omzcheatsheet). There are some great features in Oh My Zsh: you can use 1, 2, 3, and so on to return to preview directories. Also, be sure to make use of Oh My Zsh’s extensive plug-ins (magpi.cc/zshplugins). These feature everything from web search integration to Hitchhiker’s Guide to the Galaxy quotes.
Experiment with Zsh
Terminal uses Bash (Bourne Again Shell) by default, which provides many of the advanced features such as tab completion and brace expansion. However, it’s not the final word in shell technology and you can switch to the more recent Zsh (Z Shell). This is an expanded Bourne shell. ZSH has a bunch of modern features.
sudo apt install zsh
Then start Zsh with:
zsh
The first time you run Zsh, you will be offered Z Shell configuration options. This sets up the ~/.zshrc file (the configuration file). For the first time, we recommend using option ‘2’, which populates the .zshrc file with recommended settings. Z Shell has a colourful interface and a number of useful features. For example, in Zsh you now get the new take command, which combines mkdir and cd so you can make a directory and enter it with a single command:
take test
…is equivalent to:
mkdir test
cd test
A new where command joins which, and shows all locations of a file on Path. To get back from Zsh to your usual Bash shell, enter:
exit
…And you’ll be back to Bash. Take a look at the Zsh website (zsh.sourceforge.io) for more information and documentation.


