Raspberry Pi OS Tips
1 Create a custom OS
The Raspberry Pi Imager tool (magpi.cc/imager) makes preparing your SD cards a breeze, and the latest version now features a new advanced menu. It is accessed by pressing CTRL+SHIFT+X. This enables you to preset your wireless LAN network, host name, and many other options. Ideal for multiple setups, trying new operating systems, and headless projects (where you don’t need the graphical interface).
2 Go configure!
Raspberry Pi OS has features and settings that can be used to create an ideal setup. For example, if you want to interface with an I2C-based device or a Raspberry Pi camera, you’ll need to enable support. The utility you’ll need is Raspberry Pi Configuration. This can be run from the interface using Menu Preferences > Raspberry Pi Configuration. You can also run it from the command line like so: sudo raspi-config.
3 Manage your memory
Raspberry Pi OS reserves a certain amount of memory for exclusive use by the GPU (graphics processing unit). If you’re not making use of a desktop (such as a headless project) or if you are wanting a boost for a graphics-intensive application, you can change how much memory is allocated in Raspberry Pi Configuration under Performance.
4 Make your desktop your own
Not happy with the default look of the desktop? No problem.
Visit Preferences > Appearance Settings and you can change fonts, colours, placements, and the background image. If you want to go further, you can find many guides to creating different environments on the web. You can even replace the default desktop window manager with alternatives.
5 Get more software
Raspberry Pi OS comes with lots of software to get you started, from programming environments to a complete suite of office software. This is just the beginning. Take a look at
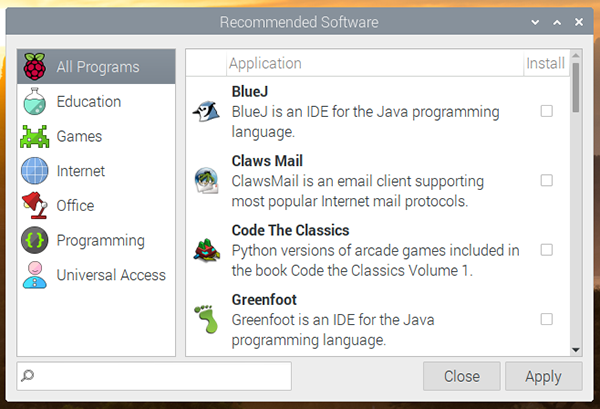
Menu > Preferences > Add New Software and you’ll find thousands of packages that are one-click installs. Check Menu > Preferences > Recommended Software for the top picks.
 |
| Credit: The MagPi — Issue 105 |
6 Backup, backup, backup!
If you’re storing data that you can’t afford to lose, make sure to be backing up. One of the easiest methods is to clone the whole SD card(although it can get large!). Check out this guide: magpi.cc/backup.
7 Accessibility
Raspberry Pi OS has optional tools to assist people. In the Recommended Software application under Preferences, select the Universal Access category to install Orca, a popular screen reader, and Magnifier which enables easy screen zooming. Also, be sure to read our ‘Make making Accessible’ feature in The MagPi issue 96 (magpi.cc/96).
 |
| Credit: The MagPi — Issue 105 |
8 Meet the terminal
On the top bar of your desktop, you’ll see a small black box with a blue bar on top. This is your link to the command line via Terminal; the real power of Raspberry Pi OS. Pressing CTRL+ALT+F1 to F6 opens six different full-screen TTY (teletype) command-line interfaces. Press CTRL+ALT+F7 to return to the regular desktop interface). The Terminal gives command-line access to your system. When following projects in The MagPi and online, getting to know this way of talking to your Raspberry Pi is essential to growing your skills. Learn more at magpi.cc/terminal.
9 Pick your favourites
Have you seen the toolbar at the top of the window? It is endlessly customisable. You can select your favourite apps for one click access, change its size, position, make it disappear when you ‘mouse away’, even have multiple panels. Just right-click on the toolbar to explore all the options.
10 Take a screenshot
Do you need to snap a short photo of your desktop? Couldn’t be easier. Just press PRINT SCREEN and a PNG image will be placed in your home folder. If you would like more options, such as a timer, the software does the work. The screenshot command scrot can be run from the command line, or you can install GNOME Screenshots. Read magpi.cc/screenshot for a full guide.
"Raspberry Pi OS has features and settings that can be used to create an ideal setup"
Makers’ Tips
11 All the microSD Cards
One of the great advantages of using SD cards is their similarity to cartridges. Trying out a new OS or project build is as simple as swapping out that little piece of plastic. Make sure you buy cards from a reputable source: there are many out there that are not built for the workload to which an operating system subjects them.
12 Get kitted up
For newcomers to physical computing, the number of components available can be overwhelming. Check the popular Raspberry Pi market sites for brilliant starter kits with all you need and nothing more. Both the JAM HAT (magpi.cc/jamhat) and CamJam EduKit (magpi.cc/edukit) are great places to start. Take a look at the Starter Kits section in our Gadget Guide(magpi.cc/gadgetguide) for more equipment.
13 Volt or bolt
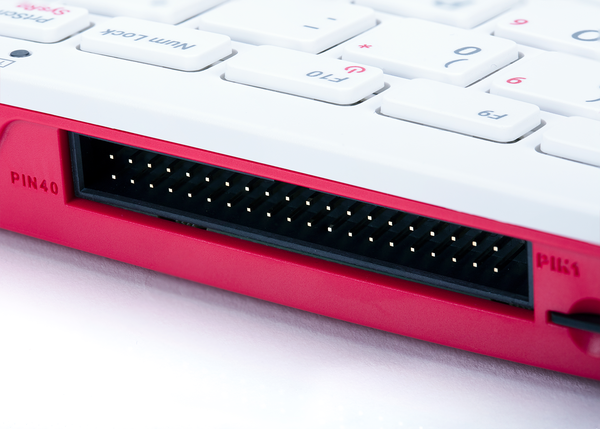
Raspberry Pi GPIO pins can power accessories at 3V3 or 5 V. Check and check again before connecting devices to one of these. The wrong one may damage your device or the computer itself. Also, be mindful of how much current you’ll draw. Finally, never connect a 5 V pin to a 3V3 pin: that would be the end of your Raspberry Pi.
 |
| Credit: The MagPi — Issue 105 |
14 Build your own robot
The ability to drive motors and servos along with the horsepower required to process sensor data make it a natural choice. There’s a lot to it though, and you can quickly find yourself with a full-time hobby. Robotics expert Danny Staple wrote a great guide to building a low-cost wheeled robot for us (magpi.cc/robot).
15 Go analogue
With the exception of the newest family member, Raspberry Pi Pico, the range of Raspberry Pi computers has been a strictly digital-only GPIO platform. If you want to read or write analogue data, such as light or moisture, you’re going to need some help. Luckily many HATs can add this feature, such as Pimoroni’s Automation HAT Mini (magpi.cc/automationhatmini).
16 Get your motor running
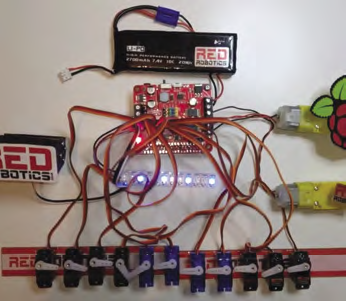
The current and voltage required for driving robot motors is not something that is going to keep your Raspberry Pi healthy for long. A robotics HAT is essential if you want your Raspberry Pi to control servos and motors. And to become truly portable, you’ll need extra power too. For exceptional power and control, have a look at our Red Board+ review in The MagPi issue 91 (magpi.cc/91).
 |
| Credit: The MagPi — Issue 105 |
17 Raspberry Pi, Pico and Arduino, oh my!
If you need analogue inputs and fast responses, consider using a microcontroller like Raspberry Pi Pico (magpi.cc/pico) in your project. Microcontrollers are much faster to respond to input. You can then use interfaces like UART, I2C, or SPI to feed data to your Raspberry Pi computer for more advanced processing.
18 Amazing camera work
You’re probably familiar with the Raspberry Pi camerafamily. Did you know that they can do much more than take photographs? Use open-source tools like Tensor Flow and Open CV to add machine learning, object recognition, and even facial identification with simple code. There’s an amazing resource at pyimagesearch.com.
19 Get a 3D printing octopus
If you’re a fan of 3D printing, you may have come across OctoPrint. This full suite of tools for controlling, monitoring, and recording 3D prints is also available as a custom Raspberry Pi image (magpi.cc/octopi). It’s one of the best upgrades to a 3D printer you can get. Take a look at our 3D printing and making feature in The MagPi #97 (magpi.cc/97).
 |
| Credit: The MagPi — Issue 105 |
20 Right one for the job
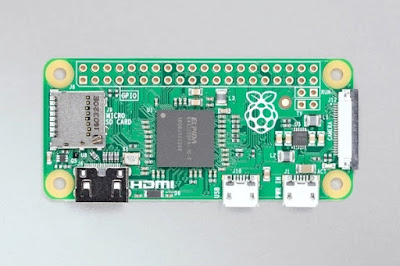
You don’t always need the full capabilities of Raspberry Pi 4. Consider a Raspberry Zero W for smaller projects. It may not have the performance of its larger sibling, but still offers the full Raspberry Pi OS, wireless LAN, and Bluetooth for an amazing price. Of course, the newest family member, Raspberry Pi Pico, brings amazing performance for under £5.
 |
| Image credit: Raspberrypi.org |
21 Supercharge your coding experience
Over the past few years, Microsoft’s Visual Studio Code (magpi.cc/vscode) has become a de facto standard in development. It’s more a turbocharged text editor than a full IDE, but its dizzying range of extensions brings it close. Visual Code is available for Raspberry Pi OS and also has extensions for remote editing over SSH and uploading to Raspberry Pi Pico.
 |
| Credit: The MagPi — Issue 105 |
22 Protect your code with version control
Git, the rather oddly named application, is an essential tool for every developer (github.com). It is a bit like time-travel for your code, allowing you to ‘snapshot’ your project and then rewind if you make a mistake, delete a file, or just change your mind. It’s also great for collaborating on projects, enabling developers to work on the same piece of code without overwriting each other’s work.
23 Code without coding
Tipped to be the way of the future, ‘no-code’ is a way of building applications without writing text, normally using a flowchart metaphor to get inputs, apply logic, and produce outputs. Raspberry Pi OS is ahead of the curve: try Scratch (magpi.cc/scratch), building-block approach to making fun applications, or the more powerful Node‑RED (magpi.cc/nodered).
"no-code is a way of building applications without writing text"
24 Stuck? Ask Stack Exchange
The Stack Exchange family of websites is a Q&A service for developers and other technical roles. If you’re stuck on a problem, the chances are someone else was too and turned to Stack Exchange for help. This is an amazing resource whose contribution to the coding community cannot be underestimated. There’s a dedicated Raspberry Pi forum too (magpi.cc/raspberrypisxc).
25 Avoid code spaghetti
Programming languages like Python and Node.js rely on massive repositories of code libraries to extend their capabilities. Different dependencies can cause problems with conflicting versions. Virtual environments allow you to ‘ring fence’ a project and its dependencies so you can avoid this. Python 3 has this capability baked in and it’s worth learning about it before coming unstuck. See magpi.cc/venv.
 |
| Credit: The MagPi — Issue 105 |
Security Tips
26 Change your password
It’s obvious, but it bears repeating. Always, always change the default password. It takes under a minute and can save you significant grief, especially if your cool new project is connected in any way to the internet. Just run passwd from the command prompt or choose Menu > Preferences > Raspberry Pi Configuration and click Change Password.
27 Access Raspberry Pi from anywhere
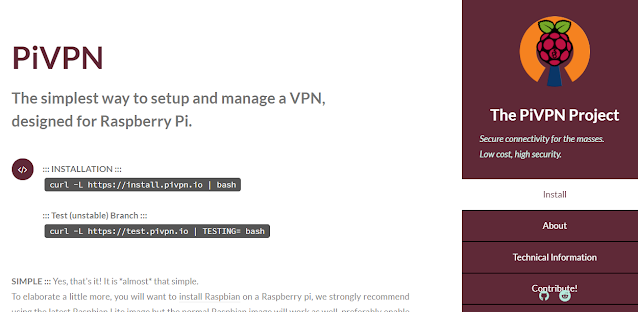
The PiVPN project (pivpn.io) has recently added support for WireGuard, a new way of securely accessing your network from the internet. It only takes a few minutes to set up and clients are available for all major operating systems, as well as iOS and Android. An easy and secure way to get onto your home network from anywhere in the world.
 |
| Image credit: PiVPN |
28 Keep ahead of the bad people
Things move fast in the world of network security. Any Raspberry Pi device must be kept up-to-date with the latest software updates to ensure that any newly discovered vulnerabilities are mitigated. Regularly, run this command from the Terminal: sudo apt -y update && sudo apt –y full-upgrade A full upgrade is better than just ‘upgrade’ because it will remove packages if needed to update the system.
29 Protect your privacy online
Fed up with ads? Don’t want your every move being tracked? Pi-hole is the answer (magpi.cc/pihole): a DNS-based adblocking solution for your whole network. Installation is a breeze, there’s a dedicated disk image for Raspberry Pi, and it can be configured to protect every internet capable device on your home network.
 |
| Credit: The MagPi — Issue 105 |
30 Raise your digital drawbridge
If you’re using Raspberry Pi OS in a potentially hostile environment (e.g. anything that isn’t your home network), consider adding a software firewall such as UFW (Uncomplicated Firewall), which is based on the popular iptables software. This makes securing network access in and out of your device quick and easy. See ‘Securing your Raspberry Pi’ (magpi.cc/security).
 |
| Credit: The MagPi — Issue 105 |
Networking Tips
31 It’s good to share
Raspberry Pi 4 makes for a brilliant NAS (network-attached storage) device. Use it in combination with a USB drive as a network-wide file repository. The popular Samba file-sharing software allows Linux, macOS, and Windows machines to map drives. Ideal for family file-sharing. See magpi.cc/samba for a tutorial.
32 What’s in a name?
Every Raspberry Pi OS installation comes configured with a network ‘host name’ of ‘raspberrypi’. When connected to your network, more than one of these is going to cause confusion, so it’s essential to set the host name of the device to something unique in Preferences > Raspberry Pi Configuration.
33 Build a web server
Raspberry Pi makes a brilliant web server and setting it up is as simple as running sudo apt install nginx. NGINX (pronounced ‘Engine-X’) is a modern, fast web server. Straight after install, you should be able to put your Raspberry Pi’s address in a web browser and see a ‘hello’ message. See ‘Setting up an NGINX web server’ (magpi.cc/nginx).
34 Command Raspberry Pi from any computer
SSH or ‘Secure Shell’ is a common method of accessing a remote command line. It’s a great way for controlling Raspberry Pi devices that are hard to reach or running without a monitor or keyboard (‘headless’). Enable SSH in Raspberry Pi Configuration (under the Interfaces tab) and then log in from another computer using the ssh command-line application – or, if on Windows, puTTY. See ‘Remote control your Raspberry Pi’ (magpi.cc/ssh) for a tutorial.
35 I can VNC you
VNC is like SSH but for the entire desktop. It streams the desktop image to a remote computer and sends key presses and mouse movements back. Every Raspberry Pi OS Desktop has VNC available, but is not enabled by default, so just enable it in Raspberry Pi Configuration. Click the Interfaces tab and you’ll find it just under SSH. You then need a VNC client app on your remote computer, such as VNC Viewer or TightVNC. See magpi.cc/vnc for a tutorial.
36 The sudo that you do
Raspberry Pi OS is very secure. One of the ways it protects itself is to only allow system-wide changes to be made by the administration (or ‘root’) user. A simple way to run any command as the root user is to prefix it with ‘sudo’ Super‑user Do). See ‘Root user/sudo’ (magpi.cc/sudo) for more info on sudo and running commands as a root user.
 |
| Credit: The MagPi — Issue 105 |
37 Save time with aliases
Do you find yourself repeatedly typing the same commands? Create an alias! These are short cuts that you can define to convert long commands into anything you want. Create or edit the file ~/.bashrc, then add them in like this: alias l='ls --color=auto'. A full guide can be found at magpi.cc/bashrc.
38 Take the command line back in time
Now how did that super-long Docker command go? Can’t remember? Don’t worry. Just type history and all your commands of the past are shown. You can also use the up arrow to cycle through your previous commands. Combine history with grep to find a certain line, e.g. history | grep docker. You can also press CTRL+R to do a reverse search of your command-line history. Just enter any word (such as ‘apt’ to search for the last command you entered with that word).
39 !!
No, that isn’t a typo. Bang-bang (or !!) means ‘the last command you ran’. Why is this useful? Because of those times you forgot to prefix a command with sudo. Don’t retype the whole thing, just enter sudo !! and you’re set. Forget to pipe a command? Try !! | <next command>. You can also combine ! with history to run commands. Just use ! with the number in history.
40 What’s going on?
If your Raspberry Pi is running hot or seems to be slow, it may be that a process has gone rogue and is spiralling out of control. There are a few ways to find out what the culprit is. The easiest is to run Task Manager from Accessories. If you don’t have a desktop, ps ax will list every process running and top will show processes in order of CPU usage.
Super Short Cuts
41 Super-fast terminal
Raspberry Pi OS desktop comes with a range of useful keyboard short cuts to help you get the job done quickly. Need a terminal in a hurry? CTRL+ALT+T will have your command line up in a second.
42 Arrange your windows
Desktop looking a little crowded? There are a few short cuts that can help you get your windows in alignment. With a window focused, use CTRL+ALT+UP ARROW to set it full screen. CTRL+ALT+Left or Right Arrow will move it to half of the desktop.
43 Take up all the screen!
If you’re working on a particular window and maybe you’re on a smaller screen, such as a Raspberry Pi touchscreen, you might find the menu bar is taking up useful space. Simply pressing ALT+F11 with your chosen window focused will expand it to fill all the available screen. ALT+F11 again will reduce it down to its original size.
44 Fast running
Need to access the menu? Don’t waste time and energy with that mouse – just click the command key on your keyboard! That’s the Raspberry Pi logo on the official keyboard, or the Windows logo or Apple button on their respective keyboards. If you want to run a command quickly, just press ALT+F2 to bring up a ‘run dialog’.
45 ALT and click
Did you know you can drag windows around by holding down the ALT key and dragging any part of the window with the left mouse button? It’s handy for when a window ends up off of the side of the screen and you can’t access the menu bar. Also, you can resize a window by holding down the ALT key and clicking and dragging with the right mouse button. Much easier than finding the corner of a window.
46 You’re on mute!
Yes, the application of 2020 can be coaxed into running on a Raspberry Pi. Zoom has a semi-hidden web app that will work with Chromium. When going to a meeting, click the link and an error will appear. Dismiss this and click ‘Click here’ until it says ‘start from your browser’. It’s a demanding application, so we recommend a Raspberry Pi 4 for this one. See ‘Working from home with Raspberry Pi’ (magpi.cc/workfromhome) or check out The MagPi issue #93 (magpi.cc/93).
47 Printing
Printing can be a tricky thing to get working. Luckily, Raspberry Pi supports two key technologies to get things working. Firstly, CUPS is an Apple-driven, open-source project to bring printing to Linux-based systems. Secondly, IPP (Internet Printing Protocol) is a ‘common ground’ that most modern printers support if you find ARM-based drivers are unavailable. Read ‘Printing at home from your Raspberry Pi’ (magpi.cc/printing).
48 Dashboards
It’s perfectly possible to use Raspberry Pi 4 as a ‘daily driver’ workstation. However, if you’re using something a bit more powerful, why not set up a Raspberry Pi dashboard? Use open-source projects such as Grafana to create charts, alerts, and more. Combine with a Raspberry Pi touchscreen and case for a beautiful sidekick to your PC. See The MagPi #98 for a guide to building a portable Raspberry Pi with a touchscreen.
49 Home automation
The excellent Home Assistant (available as an SD card image for Raspberry Pi) allows web-based control of a huge range of internet-connected devices. Perfect for creating the right lighting and temperature for your home office. If you’re concerned about air quality, combine it with a Pimoroni Enviro+ for particle monitoring. See ‘Home of the future’ in The MagPi issue 104 (magpi.cc/104).
50 LibreOffice
The LibreOffice suite has come on in leaps and bounds over the past few years. This has become a serious contender in the world of office applications. Word processing, spreadsheets, databases, presentations, and more for free. The entire collection is installed with a ‘Recommended Software’ Raspberry Pi OS image or within a few clicks on the desktop.
Original Content Credit : The MagPi — Issue 105
The lifeblood of the Raspberry Pi and maker communities is the first and third component accessories. They provide new features and make it easier to complete projects.
SB Components, a UK-based official Raspberry Pi Reseller, was the first to market. They have launched 17 new Pico accessories, ranging from basic breakout boards that allow several addons to be utilised for DIY projects to exploring the potential of the Raspberry Pi Pico, and a Pico LoRa™ Expansion board, which comes with an onboard CH340 USB TO UART converter, Voltage Level Translator(74HC125V), E22-900T22S SMA antenna connector that covers 868MHz & 433MHz frequency band. We have shared the products below:
- Pico LoRa Expansion 868MHz : Pico LoRa™ Expansion is a low-power consumption data transmission board that includes an onboard CH340 USB TO UART converter, a Voltage Level Translator (74HC125V), an E22-900T22S SMA antenna connector that covers the 868MHz frequency band, an onboard 1.14" LCD, an IPEX antenna connector, and LoRa™ Spread Spectrum Modulation technology with auto multi-level repeating. Pico LoRa™ Expansion is developed to enable data transmission up to 5 KM through serial port. Pico LoRa™ Expansion was created to allow data transfer up to 5 kilometres through serial interface. 433MHz LoRa Expansion for Pico also Available.
- 1.28” Round LCD HAT for Pico : 1.28-inch display HAT with 240 x 240 resolution, 65K RGB colours, crisp and colourful display effect, and joystick, developed for the Raspberry Pi Pico to broaden its engagement through SPI connection by offering a standard 40 pin Pico GPIO interface.
- 1.14” LCD HAT For Pico : 1.14-inch display expansion board module with a joystick and a resolution of 240135, 65K RGB colours, clean and colourful presenting effect, created specifically for Raspberry Pi Pico to increase its involvement through SPI connection by offering a standard 40 pin GPIO interface.
- Pico Motor Driver HAT : DC motor control module supplied by one H-bridge IC L293D with a motor input supply voltage range of 6 V to 12 V. It is intended to link two DC motors at the same time or one stepper motor, allowing the user to create projects with a small footprint and great efficiency.
- Pico RTC (Real Time Clock) HAT : Real-Time clock extension module with the powerful IC DS3231, backup battery holder, 3.3 V working voltage, and Fast (400kHz) I2C Interface that detects time and aligns the device's time with the "Real-Time".
- Pico RFID Expansion : RFID Reader with a 125KHz frequency and a small design that includes a programmable 0.91” Oled screen and an improved UART/I2C interface that is compatible with the Raspberry Pi Pico Board.
- Pico Dual Channel Relay HAT : Relay HAT is a two-channel high-quality relay with loads up to 250V AC/ 7 A, 30V DC/ 10A to control high voltage/current devices.
- Pico Single Channel Relay HAT : It can handle loads of up to 250V AC/ 7A and 30V DC/ 10A, allowing you to manage high voltage/current devices. It has a Female Pin Header for easy connection to the Raspberry Pi Pico through stacking.
- Pico 3V Relay HAT : High-quality two-channel relay with a switching voltage (VAC) of up to 2A/120V (Max), a switching voltage (VDC) of up to 2A/24V (Max), and an operating voltage of 3.3V.
- Pico 2 Channel Expander : Pico 2 CH Expander is intended specifically for use as a GPIO extender, having 2 sets of 2 x 20 pin headers for connecting to HATs or Breadboards.
- Pico 4 Channel Expander : Pico 4 Channel Expander is intended to function as a GPIO extender by offering 4 sets of two 20-pin headers for use with HATs or breadboards.
- Pico HAT Expansion : HAT Expansion is a Raspberry Pi Pico input/output expansion board that includes one set of 2x20 pin headers in the form of a Raspberry Pi Header and one set of 2 x 20 pin. This implies that any HAT developed for the Raspberry Pi Board can be plugged in.
- Pico GPIO Expansion Board : Pico GPIO Expansion Board with 3.3 V output voltage. Pico GPIO Expansion Board is designed to split off all of the Raspberry Pi Pico development board's pins and power in two ways (male or female header). It enables the user to connect it to other components via a jumper wire.
- Pico Breadboard Kit : A multi-purpose Kit with a "400 points half-size breadboard" on top, a Programmable Buzzer, 4 Programmable LEDs, 4 Push buttons, and dedicated 5V, 3v3, and GND pins all in one spot. It contains sophisticated features like as individually controlled LEDs, switches, and a 400-point half-size breadboard that allows users to efficiently prototype their ideas using the Raspberry Pi Pico.
- Pico Relay Board : Up to four appliances and loads of up to 250V AC at 7A and 30V DC at 10A can be controlled. It allows users to control high-voltage/high-current devices. It has a “Optocoupler,” which enables the circuit to convey an electrical signal between two separated circuits using light energy.
- Pico Zero Board : Pico Zero Board is a useful and well-labelled board with a 6x20 grid of 2.54mm spacing mounting holes that allows users to quickly solder the Pico pins. With properly connecting bespoke circuits, the Pico Zero Board provides a secure, compact, and long-term safe housing for your breadboard project!
- Pico Zero Expansion : cleanly labelled expansion, with a 6x20 grid in the centre for the Raspberry Pi Pico and an 8x20 grid on both sides to connect peripherals, 2.54mm spacing mounting holes suited for users to simply solder the Pico pins
Also Check:
- Pico Projects For Beginners - Raspberry Pi
- How to connect a Raspberry Pi Pico to LoRaWAN
- Best Raspberry Pi Pico Breakout And Pico HAT
- How to use I2C Pins in Raspberry Pi Pico | I2C Scanner Code
- Raspberry Pi Pico Launched Globally With Pico Add-On & Pico Expansions.
- Raspberry Pi Pico 2 Channel Expander | GPIO Expander For Pico


